Wednesday, May 29, 2013

Stainless Steel Media Tumbling

I have been reloading for close to 20 years now, My Father & I started with some old equipment we bought at an estate sale. We now have our own set-ups and reload almost every caliber we own.

Last year I bought myself a stainless steel media tumbler from these guys: http://www.stainlesstumblingmedia.com/

Funny thing is the company I bought the tumbler from is in Utah, but the tumbler is made in Auburn, just a few miles from where I live....


Anyway, I decided to make a post about how this stuff works.

The pins are tiny, two or three would fit in a primer flash hole (and sometimes get stuck there)


So to demonstrate how well these work, I will start with some really ugly brass. I found this stuff in an old shooting pit (not used for the last year or so). I picked up about 10 lbs of brass, most of it I could use, a few odd ball calibers, but mostly 9mm, 45 ACP, 38 Spl, and quite a few 40 S&W (which I do not reload).

This is a pic of the 40 S&W brass after I rinsed the mud off of them.

 
From past experience I know that the stainless media can get these clean, but they will need a bit of help, so after de-priming them I soaked them in vinegar for a few hours to help loosen the corrosion.


 The vinegar turns an aqua blue/green color from the copper oxide.

Next I will rinse in hot water and put them in the tumbler

After one 6-hour cycle in the tumbler this is what the water looked like


  This is what the brass looked like, I will try another round in the tumbler


After another 6 hours in the tumbler we have success:


some still have a pinkish hue to them, but most came out looking like new

here are a couple of before and after pictures to show the difference


Something for the Hoplophobes

A fellow WaGunner (Doc Nugent) has started a new project and is dedicating it to the most afflicted of all hoplophobes: Diane Feinstein


Here is his page, he is starting with a Marlin Papoose (take down .22 rifle)

http://www.carcentric.com/Papoose.htm

anyways, here is my 10-22 that has every evil feature they do not like. I even mounted a universal bayonet lug (once I found the flash hider I installed was the same diameter as an AR milspec one) so I could mount an M-7/M-9 Bayonet. The only thing that could make this more evil (in their eyes) is a suppressor.


Standard Ruger 10-22 (newer one with the matte finish)
Butler Creek Folding Pistol grip stock
UTG Barrel Shroud (you know "that thing that goes up") quad rail/scope mount
Leapers 3-9x42 scope
Knights Armament Vertical Fore Grip
Universal Bayonet Lug (not sure of mfg)
Flash Hider (Eagle brand I think)
Imperial M-7 Bayonet
Ruger BX-25 Magazine

the internal mods are a KIDD bolt buffer (which I highly recommend) and a polish job on the internals

Kidd Bolt Buffer

Internal polishing instructions: 10-22 Action Job
click on the pics for larger versions

December 2013 update: I just finished installing a new ATI Strike Force Stock on my 10-22, this is what it looks like now (in the eyes of the Hoplophobe):


Thursday, May 23, 2013

Another S&W

my reputation is allowing me to work on some pretty nice guns. This time it is an older "Pinned & Recessed" Model 19 Smith & Wesson. The finish was less than perfect, here are the before pics


 after dis-assembly & de-greasing I used naval jelly to remove the finish

This looks like I destroyed the gun, the acid leaves a crusty like finish on the metal.


The wire wheel removes the scale left by the acid


Sanding


 the polish with the buffer


next I hand polish, using Mother's Mag & chrome polish, this removes the fine swirls and scratches


before it is ready I will probably have 10-12 hours in sanding & polishing

In addition to the outside, I also polished the hinge on the crane and the lock-up ramp. This makes opening & closing the crane much smoother. I will also smooth the inside of the lock work (the area that the internal parts come in contact with), this will smooth up the trigger pull without touching the hammer, sear or trigger mating surfaces.

Here is the gun after bluing. I let it soak in oil and will wait 24 hrs or more before reassembling the gun. It looks really good, only a couple of small spots that aren't quite perfect.


Finished, again I am better at working on guns than taking pictures


Father & Son Project

My Father inherited this old Winchester model 1906 .22 pump (aka the gallery gun) from a friend. This gun was made in 1923 and served as a rodent killer in a feed store in Renton WA for 50+ years. The stock was a cheap "gum wood" and the finish on the steel was completely gone. There was no chance of diminishing collector value as this gun had none to start with.
The magazine tube had come loose from the dovetail and the wood was beyond saving.
My Dad & I decided to make it a Father & Son project. Here are the before pictures


We bought new semi-inletted American Black Walnut stocks from www.gunville.com, the butt stock is much larger than the old one, we will need to shave it down, we also bought a reproduction butt plate


I had to file the sides of the receiver, the metal had deep scratches, not so much rust though.


Once flat I took the sand paper to the metal

The stock is coming along

In this picture you can see the bolt has been beaten and the edges are "ruffelled" I'll tap the metal back with a hammer and file the edges straight again.
Also one of the bolt stop screw holes had what we thought was a broken screw in it. We did not have the proper equipment to get it out and took it to Fred at C.A.R. Firearms (http://dev.carfirearms.com/). He ran a tiny drill bit down the hole and it wasn't a broken bolt, but just a bunch of crud. He cleaned it out and refused to let us pay for his time...If you are near ( the South Seattle area (Renton, Tukwila, SeaTac, Burien) go see Fred, he is a true professional and all around nice guy!

 Here I am filing the bolt face and edges of the bolt where it fits the the receiver groove (for lock up)

We ordered a new set of screws from Homestead Parts
 

The parts are pretty much ready for the bluing tank, we'll tackle the stock after the metal is ready
 Here are the parts after bluing, We still need to finish the stock, then we will reassemble
 As we began the reassembly of the gun we knew we had to overcome a common problem with these Winchester pump rifles: The magazine tube mounts. They come loose because the dove tails cut for them are very shallow. We had a couple of options. 1. weld up the dove tails and re-cut them. This option is problematic because the steel used then is not the same alloys we use today and getting the right heat, type of welding rod etc...could cause warping of the barrel or the bluing to look funny. The second option would be to use some sort of adhesive, I don't have faith in super glue and epoxy would show too much, we chose to go with JB Weld. JB Weld is a combo epoxy and metal, it dries to a gray color. We only needed a small amount and we wiped the excess off before it set up. I highly doubt anyone but the serious Winchester aficionados will notice (and the aficionados will only notice because the magazine tube is surprisingly tight).
Here are a couple of pictures of the magazine tube mounts clamped in with the JB Weld
  

The stock now has two coats of Tru-Oil and a nice satin finish, since the gun will be mostly a safe queen I'm gonna stop at two coats. Next step: Final Assembly!

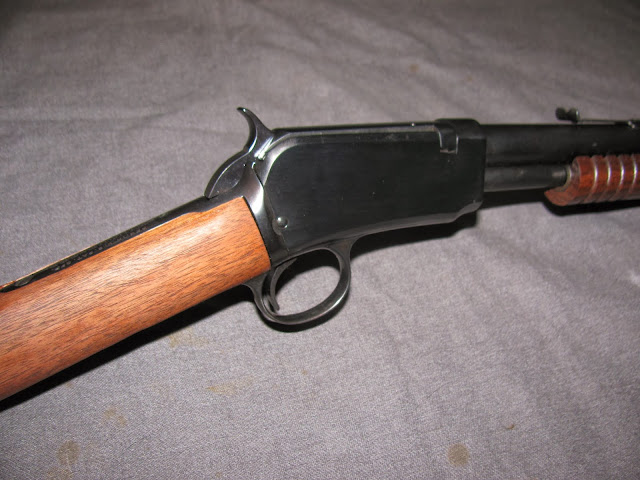
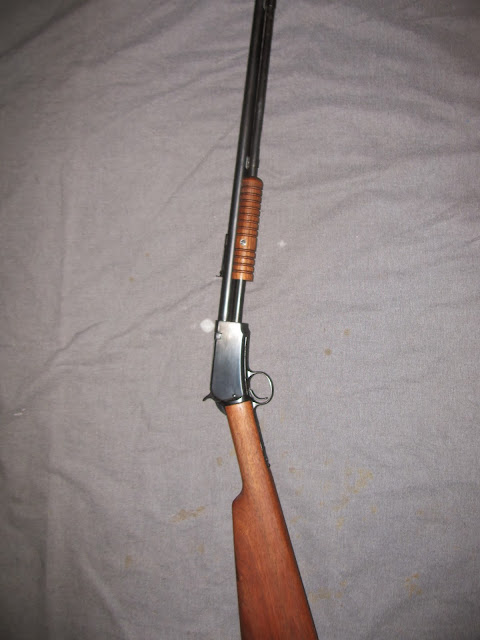
OK, I finally got the gun put together, here are the pictures of it finished:


 Here are the before and after pics