
OK, so I need another hobby like I need another hole in my head......but knife making has always intrigued me. My Grandfather was a Blacksmith and when he wasn't making horseshoes or other tools, he made knives. His knives were legendary for keeping an edge, but they were definitely not something anyone would call pretty or a work of art.
While I do not plan (at this point anyway) on buying a forge, anvil and hammers, I decided I wanted to try and make my own knives.
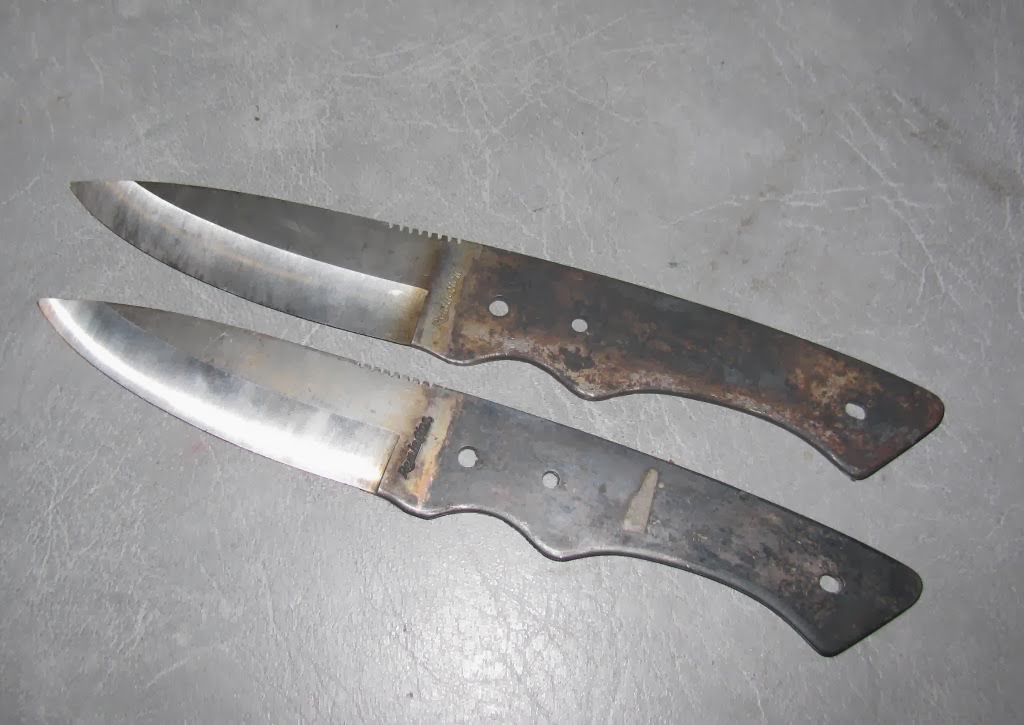
I bought these two blanks, they were nearly finished before the Camilus factory closed down. These were made for Remington and are marked "Made in the USA".
The blanks have all ready been ground and heat treated, all I need to do is install a handle, polish the steel and put a final edge on it.


I also bought these two Schrade "Gut Hook" blanks, these have not been tempered or ground, just cut out and stamped "Shrade USA 1430T". I will need to drill holes for the handle, file, grind, temper then draw temper the steel before polishing and putting a final edge on. These are also from the now closed Camilus Knife Factory, to read the story of its demise, follow this link: http://en.wikipedia.org/wiki/Camillus_Cutlery_Company


I bought this one as well, it looks like a butter knife, I'm still not sure if this is a straight razor or a table knife. It already has been tempered, polished and sharpened, it just needs a handle. The knife is stamped F. Herder ABR. SOHN Solingen with a spade, This company has been in business since 1727, but the family has been making knives since 1623!

I started on one of the gut hook knives by cutting the gut hook portion with a rat tail file, I then began filing down the top edge, I am not sure at this point if I will put an edge on the top half of the knife yet.


The updates to this post have been slow in coming, so here is a quick update.
I have been shopping for wood scales for my knives and found a deal on ebay with seveal different kinds of wood, I think there is some Zebra wood, Purple Heart, Cocobolo & Walnut, I'm no expert so I'm not sure what they all are, but here they are

My friend on the Oregon Coast got me a nice piece of Myrtle wood, it has a "shimmer" to it like pearl.

At the last gun show I found a vendor selling scrap pieces of high end Walnut, including: Claro, English, Bastogne and Royal

I was also lucky enough to find the original Rosewood handles that Remington put on their knives, I then found a piece of brass as well, now I have to get some brass pins and epoxy.


I could have used the belt sander for this, but I preferred to do it by hand to make sure I didn't take too much material


The 1st side is done (epoxy dried) so I started on the other side. I cut the piece big and used a file to hand fit the brass


Fitted and glued on, now I need to file, sand and polish

I like to do a lot of this by hand, I used an aggressive file to take the brass down level with the tang

After the initial filing was done, I filled the holes on the back pins using epoxy and some of the saw dust I collected from sanding the rosewood.


The rosewood polishes very nicely, I would have called this done, but I noticed some light sanding marks that I will need to get out and do another round of polishing.


What thickness brass stock for the bolster, I have the identical knife blank
ReplyDeleteI believe it was 1/4" thick
ReplyDelete