A blog dedicated to the love of guns, gun restoration, repair and customization
About Me: A certified yet non-professional gunsmith learning the trade through trail and inspiration
Thursday, April 28, 2016
April Gun Porn
The pictures above were found freely on the world wide web and are used under the guidelines of Fair Use, per Title 17 of the U.S. Code. Where possible the source has been credited.
If you own the copyright to any of these images and wish them to be credited or removed, please contact me immediately.
Sunday, April 24, 2016
Ironworker's Knife Build Part 2
I broke this build into two parts because is was so picture laden.
If you missed part one, you can see it here.
Next step is to make and install the handle. I have selected to use a piece of walnut.
After choosing your material, trace out the handle on the material and rough cut.
After I do the rough cut I drill the holes for the pins. first drill one half of the handle through the blade, then flip over and drill through the blade and the first scale into the second scale.
As you can see in the previous photo I have taped up the finished blade to prevent scratching or getting epoxy on it. The next step is of course applying the handle. The steel should be clean and free of loose materials or oils. I use lacquer thinner to do this. Some woods are very oily and need to also be wiped clean of oil with the thinner.
The handle should then have the shit clamped out of it. Go ahead and fit all the clamps you can find.
The squeeze out should be cleaned off the blade area at this time.
The next step after waiting for the glue to dry is to sand the handle down to meet your design criteria. I will be making a very rounded and smooth handle.
All sanding is done by hand while rounding the handle. Starting with 80 grit and working up to 400.
Once sanded I have applied a healthy coat of linseed oil. The oil will swell the fibers in the wood. I will then sand one final time with 400 grit paper and reapply some linseed oil.
The next step is to sharpen. There are a million ways to get this done. I have been having good results using a lansky system. When making a edge on a new knife it is necessary to start from the lowest grit stone and work up to the finest. Unfortunately the finest one that I have in this kit is the 1000 grit. For stainless knives I find it acceptable, carbon steel seems to be able to take a finer edge. So what I have done is to tape a piece of paper onto the 1000 grit stone and coat it with some polishing compound. I used that until I had a nice mirror polish on the edge and it would easily shave hair.
I debated if I would include the sheath build. I will, but please bear in mind that this is my fourth sheath build and I am sure there are better ways to do this work. I have learned a lot of what I do know by watching some youtube videos. There is a knife builder in the UK who goes by Jacklore knives, his work is exceptional and he has a video available on sheath making. I recommend it.
You will need some tools. Here I have an edger, a groover, a stitch layout tool, a scribe that I will be using as a punch and a freshly sharpened knife. I also used a few consumables die, waxed nylon thread, contact cement and of course leather.
First step is to make a template. Then of course transfer to leather and cut out. Here I have wet the leather where the bend will be, this helps to prevent cracking.
Here I have prepared the welt and glued it in. You can see on the upper piece that I have used the contact cement for this. I left a space in the welt to install the ferro rod loop
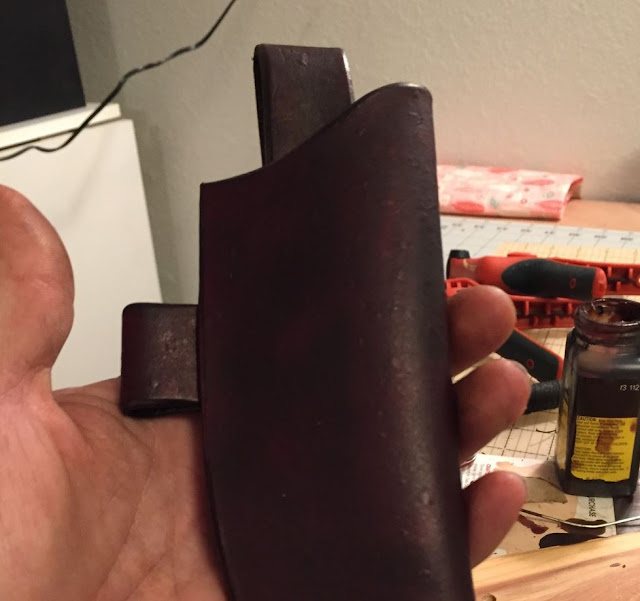
Here you can see I have prepared the ferro rod loop and the belt loop. Both pieces have been dyed and had the edges burnished to smooth them out. To do this you profile the leather on the edges and then apply some bar soap, you can then rub the edges with a smooth roundish object to get a nice smooth appearance on the edge. They make a tool for this called a slicker, I did not have one at the time. I did receive one for Christmas this year though. Also you can see that I have done the layout, grooving and punched holes for stitching the belt loop on.
The next step is to dye the sheath. I prefer to do the inside also.
After that the belt loop is glued into place.
The belt loop is then stitched into place. As seen in the previous photo I prefer to groove the inside of the sheath so that the threads are protected slightly from being cut by the knife sliding in and out of the sheath.
The next step is to glue the sheath shut. Here you can see the sheath has been glued, the edges sanded smooth, dyed, edges profiled, rubbed with soap, and burnished. I have done this prior to installation of the ferro rod loop as it would make these tasks more difficult.
Here you can see the addition of the ferro rod loop.
Here you can see I have grooved for stitching and done the stitching layout.
Here you can see that the sheath has been stitched and aside from some boot grease to soften and seal the leather it is complete.
And now for the completed knife porn. This has been the most difficult of the five knives I have made and also has turned out the best. Also I have the most hours into this one. I estimate 20 hours of work went into this. Thanks for looking. I appreciate any questions or comments. I will follow up at some point with a link to the many videos that I have used as reference for this work.
Thursday, April 21, 2016
10/22 Magazine Review: High Tower Armory RM25
When I first heard about the High Tower Armory RM25 magazine...I thought "another magazine maker, late to the party", but after watching the video I was intrigued...intrigued enough to order one up.
The price on the High Tower website was $29.99, but I noticed a coupon code box, a quick Google search netted me a two coupon code deal from Slick Guns.com, I got the magazine for $17.99 and free shipping!
Stats:
Price Point: MSRP $29.99
First Impressions: The packaging was sufficient, and re-usable. The bag was the "zip-lock" type, a trend I have been seeing a lot of among gun parts makers and one that I like. I know it is a silly thing to dwell on, but I like reusable packaging...
The instructions were more than adequate and included a parts diagram.
The packaging was also clearly labeled "made in USA" something I look for in everything I buy.
The magazine has a nice heft to it, and it appears as though the designers took the Ruger BX25 magazine and added Magpul PMag features to it.
If Magpul was planning on making a 10/22 magazine (they recently began producing 10/22 stocks, so who knows?) I think High Tower may have beaten them to the punch.
Fit:
For the record I am fitting these into my 2008 vintage 10/22 with the ATI stock, Ruger used these stocks as a factory option and I have yet to have any issues with the stock or the standard BX25 magazines I have been using in it.
The magazine fit into the mag well easily, very little resistance. Their is a complete absence of side to side and front to back play. You'd think hat this magazine was made by Ruger themselves, I don't think it could fit better
Disassembly:
As promised no "tools" are needed to disassemble the RM25, although you will need something to depress the magazine floor plate keeper.
I used a ball point pen, but the designers made the hole big enough that you could use the bullet end of a .22 cartridge.
The parts came apart pretty easily. I was impressed by the gauge of the plastic and the "hefty" feel of the magazine.
The second orange follower nub is longer so you can use it to load the magazine (with the window removed). Also the windows are identical and can be swapped from side to side.
This video shows the disassembly/reassembly process and how to use the quick reload feature
Loading the magazine was simple and quick, just like the Ruger's BX-25. I did not remove the windows and install the follower with the loading knob, I wanted to test function the magazine first.
This magazine was impeccable, no malfunctions whatsoever. I pulled the trigger as fast as I could as well as some slow aimed fire...nothing tripped up this magazine.
We also tried the magazine in our new 10/22 take-down model with the same results.
The ammo used was Federal Champion bulk ammo (36gr copper plated HP, 1260fps), CCI Minimag (40gr copper plated RN, 1235fps) and Remington Golden Bullet (40gr copper plated RN, 1255fps)
Perfect fit, flawless function, good price, easy disassembly...
I could not find a single thing wrong with this magazine, it definitely is worth checking out.
The price on the High Tower website was $29.99, but I noticed a coupon code box, a quick Google search netted me a two coupon code deal from Slick Guns.com, I got the magazine for $17.99 and free shipping!
Stats:
- Fiber reinforced polymer construction
- Tool-less disassembly
- Steel feed lips with Nitride coating
- 25 round capacity
- Removable windows with round count markers
- Quick reload mode
- Molded in four colors (Black, FDE, Desert Tan and OD)
- Made in USA
Price Point: MSRP $29.99
First Impressions: The packaging was sufficient, and re-usable. The bag was the "zip-lock" type, a trend I have been seeing a lot of among gun parts makers and one that I like. I know it is a silly thing to dwell on, but I like reusable packaging...
The instructions were more than adequate and included a parts diagram.
The packaging was also clearly labeled "made in USA" something I look for in everything I buy.
The magazine has a nice heft to it, and it appears as though the designers took the Ruger BX25 magazine and added Magpul PMag features to it.
If Magpul was planning on making a 10/22 magazine (they recently began producing 10/22 stocks, so who knows?) I think High Tower may have beaten them to the punch.
Fit:
For the record I am fitting these into my 2008 vintage 10/22 with the ATI stock, Ruger used these stocks as a factory option and I have yet to have any issues with the stock or the standard BX25 magazines I have been using in it.
The magazine fit into the mag well easily, very little resistance. Their is a complete absence of side to side and front to back play. You'd think hat this magazine was made by Ruger themselves, I don't think it could fit better
Disassembly:
As promised no "tools" are needed to disassemble the RM25, although you will need something to depress the magazine floor plate keeper.
I used a ball point pen, but the designers made the hole big enough that you could use the bullet end of a .22 cartridge.
The parts came apart pretty easily. I was impressed by the gauge of the plastic and the "hefty" feel of the magazine.
The second orange follower nub is longer so you can use it to load the magazine (with the window removed). Also the windows are identical and can be swapped from side to side.
This video shows the disassembly/reassembly process and how to use the quick reload feature
Loading the magazine was simple and quick, just like the Ruger's BX-25. I did not remove the windows and install the follower with the loading knob, I wanted to test function the magazine first.
This magazine was impeccable, no malfunctions whatsoever. I pulled the trigger as fast as I could as well as some slow aimed fire...nothing tripped up this magazine.
We also tried the magazine in our new 10/22 take-down model with the same results.
The ammo used was Federal Champion bulk ammo (36gr copper plated HP, 1260fps), CCI Minimag (40gr copper plated RN, 1235fps) and Remington Golden Bullet (40gr copper plated RN, 1255fps)
Perfect fit, flawless function, good price, easy disassembly...
I could not find a single thing wrong with this magazine, it definitely is worth checking out.
Sunday, April 17, 2016
The Ruger Spencer Carbine Part 3
Part 3 of this build, click here for Part 1 & Part 2
I had been asked if I intended to "antique" the metal to make the gun appear to be 100+ years old. I covered this on a previous post.
While that may look cool, it would be difficult to pull off, especially with this gun. The receiver and barrel band are aluminum and other parts like the trigger housing and butt plate are plastic. So I decided this one will look like a new Spencer would have in 1865.
This project was well under way when I found this used 10/22 rifle. It came with an extra stock (foundations for more projects?).
The rifle is in good shape, so other than my usual action/trigger job and bolt buffer and swapping out the rear sight, it is GTG.
when it came time to stain the stock, I had to do some research, between 1980 and 2008 the stocks were birch, after 2008 the material is maple or beech. Neither is easy to stain.
I asked some wood workers the best way to stain wood birch, beech or maple, I got all kinds of advice....Including the following:
- Water based wood dye, followed by dewaxed shellac
- Alcohol based wood dye, followed by a sealer
- Water based wood dye followed by pre-stain conditioner, followed by gel stain
- Shoe polish, followed by your favorite sealer
- RIT fabric dye, followed by a sealer
- Coffee
- Tea
- Pine tar
- Steel wool dissolved in vinegar
- Leather dye, followed by a sealer
The shoe polish could work, but some recommend it only as a top coat.
RIT fabric dye is out, I believe it contains salt.
The vinegar and metal filings solution is really designed for oak to "ebonize" it (making it black like ebony) it has something to do with the tannins in the wood reacting with the vinegar and iron.
Then I found one guy who had successfully turned a commercial, post-war M1 Carbine birch stock into a fresh from the battlefield walnut stock (at least it sure looks that way). So I followed his advice and used some Fiebings Dark Brown leather dye. They say that alcohol based dyes work better on birch for some reason and the Fiebings is alcohol based.
After sanding to 400 grit, I used the Fiebings Dark Brown leather dye
The color went on pretty evenly an left the wood looking like oil saturated walnut, like an old military stock should look.
After rubbed in some brown shoe polish. I sealed it with a couple of coats of Minwax Antique Oil Finish followed by a gentle polishing with some 0000 steel wool.
The gun is darker in some parts, but it actually looks a lot like an old military stock might look....
I snapped some pictures in the natural light to show what the stock looks like with the dyed finish
I put the Spencer stock over the top of a factory one so you can see what we changed.
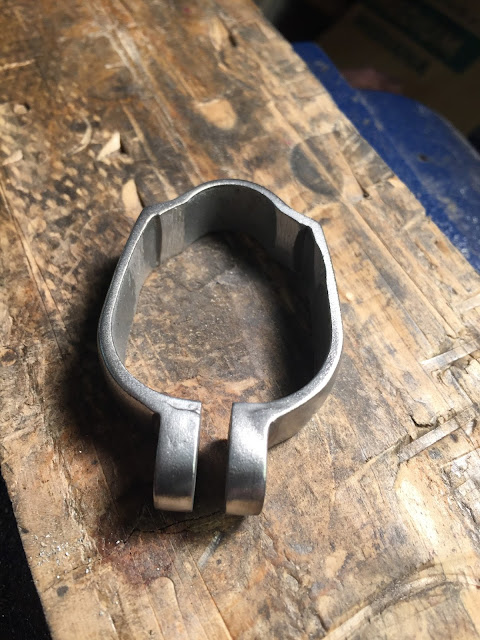
I then installed the barrelled action in the stock and checked the fit of the barrel band
As expected I needed to remove some of the shoulder to get it to fit over the thicker part of the barrel
It now fits
You can see the areas that were filed away
I used my wire wheel to remove the anodizing or paint or whatever was on the surface, preparing it for paint
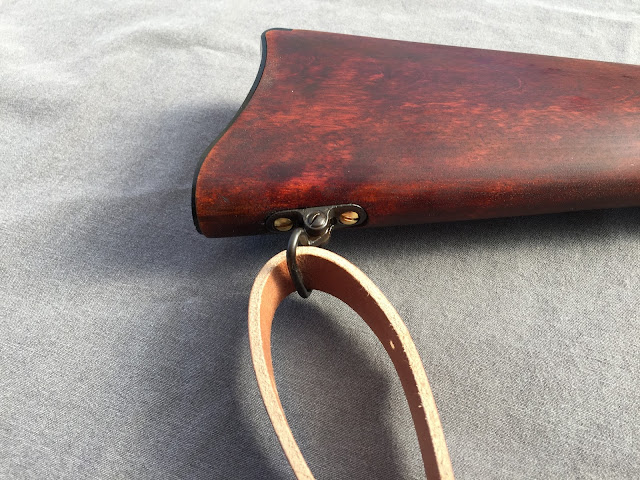
I installed the sling mounts and the saddle ring after they came out of the oil tank following the rebluing they received.
I also finished the trigger group with the extended mag release.
The leaf rear sight that I bought would not fit, so I installed this Williams peep sight that I had in my parts bin.
The Peep Sight/picatinney rail is not the right look, so I bought one of these sets, also from Williams
and then of course I bought a filler blank for the empty dovetail
Finished!
Final Words:
Thinking about the project and the reaction that Bill Ruger would have given, if he were still around, I think Bill would have been pleased
Bill had a real love for the simplicity and practical nature of the late 19th century carbines.
For the very look of 10/22 carbine (and the .44 Carbine that came before it) was partly inspired by those guns of old.
They were built for work, the fact that they looked good was a pleasant consequence.
Bill once described this as "avoiding all the usual banalities" and this gun does just that.
In my opinion this gun, or one like it, should have been the 50th Anniversary model (too bad Hipshot didn't enter the contest).
Not to take away anything from Gary of Michigan (the gentleman whose design was chosen for the 50th Anniversary model), but this gun would have been a more fitting tribute to both Bill Ruger and those guns he loved.
My appreciation goes out to Hipshot for his inspiration.
Subscribe to:
Comments (Atom)


