Monday, May 29, 2017

The Ruger 10/22 LTR Project part 3

Don't forget to fly Old Glory and spend at least a few minutes remembering why we have the day off....


In part two we cut the stock and installed the necessary wood pieces and fitted rear grip anchor.

See the previous posts here:

Now we will focus on the construction of the butt stock and its attachment

Starting with the anchors for the butt stock, I clamped the barrel nut in place and drilled the first two holes


After countersinking the holes, I put some clay in the nutserts to protect the threads, filled the holes with 5 min ClearWeld epoxy and gently tapped the nutserts in place


After the first 2 anchor holes cured, I installed two of the bolts in the new anchors (for proper alignment) and drilled the last two holes.


Then repeated the process


 While the epoxy was curing I shortened the bolts to the correct length

Once the epoxy cured I did a trial fit


I started on the butt plate. I cut this piece from some 2" wide x 1/4" thick aluminum, I used a template to trace an arch


Then used the belt sander to round it off


After sanding and radiusing the edges, I glued a piece of flip flop to the plate


After it cured, I trued up the two using the 400 grit belt on the belt sander


Then I started figuring a way to connect the butt plate to the stock tube. I don't have access to a heliarc welder and didn't want to bother with trying to solder it, so I decided to use JB Weld. I stuffed some paper in the end of the tube to stop the JB Weld from running down inside.
Once I gooped it up good, I joined the two and pushed the paper down against butt plate, forcing the JB Weld against the butt plate.


I mixed up some more JB weld and forced it into a small syringe.
I then carefully spread it around the joint, cleaning up an mess with acetone and a cotton swab


While the JB Weld was curing, I started on the front picatinney mount. The 10/22 stock has a rounded bottom, I'll need to flatten it out some


After some work with the file I marked the center line


Then I drilled the holes and temporarily mounted it, the bolts will be trimmed after I figure out how to use them to secure the barrel shroud as well.


here it is with both fore and aft grips and the butt stock in place


Stay tuned for part 4


Thursday, May 25, 2017

A Tribute to the Richardson Guerrilla Gun part 4

If you missed the previous posts you can find them at the links below:

Featured Gun: The Richardson Guerrilla Gun 

A Tribute to the Richardson Guerrilla Gun part 1 

A Tribute to the Richardson Guerrilla Gun part 2

A Tribute to the Richardson Guerrilla Gun part 3


Now that it is time to refinish the wood and paint the metal parts... I wanted to make a couple small modifications....

cutting two grooves in the breech allow you to quickly remove spent shells.


I also wanted to add a front bead, even though the originals didn't have one, and frankly didn't need one, I decided it would be a small but nice upgrade.

I had this brass screw in my parts bin, that should work perfectly. I wrapped the threads with tape and chucked it into my drill press. On high speed I used a file to shape it into a dome.


Turns out this was not brass, but brass plated, oh well, I am going to use it anyway, here it is next to an unmodified one. I left a small groove which I will align with the bore.


I then cut it short with the Dremel tool


As it turns out I didn't have the correct size tap for this screw, so I drilled the barrel with a 3/16 drill bit, which was a snug fit and after painting the barrel, I glued it in place with JB weld.


Back to the stock....

After sanding with 60 grit, I moved to 100 grit, then 225 grit. I then wetted the wood to "dewhisker" it.


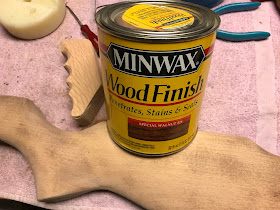
I then sanded lightly with 320 grit and applied 1 coat of Minwax "Special Walnut" stain


After wiping off the excess I let the stock sit for 8 hours, then applied the first coat of Minwax Polyurethane clear semi-gloss

After drying the finish looked horrible, I think the poly was too old.
 
So I sanded it back down with 500 grit sand paper and wiped it down with acetone. 


I had sanded through the stain in a couple of places, so I reapplied some of the Minwax "Special Walnut"


I then broke out the Birchwood-Casey Tru-Oil and rubbed in the first coat, working in all directions, rubbing until the stock was almost dry, then checked for missed areas and any runs
Here it is after 4 coats


I then painted the metal parts with RustOLeum textured black spray paint
And here it is finished:


These last two show the position of the trigger when the barrel is ahead of the trigger lock and when fully seated


Before publishing this final post I was able to take the gun out and shoot it. While we got reliable primer strikes and the gun fired without any problems, the breech face wasn't supporting the entire base of the cartridge, so we got some bulging. 
This is really only an issue if you plan on reloading the spent shells.
For the record we were shooting Federal Top Gun target loads, 1oz, #8 shot.


Costs for the build:

Stock: $0 (broken Beeman air gun stock)
1" pipe (receiver): $6.78
3/4" pipe (barrel): $10.88
nuts and bolts: $5.90 
Trigger Parts: $1.00
Stain: $0 (already had) 

Grand Total: $24.56


Here is my version compared to an original


Friday, May 19, 2017

A Tribute to the Richardson Guerrilla Gun part 2


Part two of  this series, see the introduction here and part one here

I had to run a 1/4" drill bit through the recoil plate, removing a bit of wood, to fit a 1/4-20 cap screw


I also drilled the front trigger guard screw hole to 1/4"


I then cut the stock down, I will try to re-use the old pieces to fill the bottom of the gap. When cutting the wood I smelled a familiar smell....this "European Hardwood" smells like oak, but it doesn't look like American oak, maybe some different variety?

 
Here you can see the radius is off, we need to widen the barrel channel a bit


I wrapped sand paper around the receiver tube and sanded the barrel channel so the receiver would make full contact, we're almost there


I also relieved the rear of the receiver area to make room for the firing pin bolt


I cut the left over forend pieces and glued them together


 Then I fitted and glued the extra wood to the stock to fill the gap, once it dries, I will cut, sand and profile the stock


I rounded the front of the stock and shortened it to come just short of the receiver tube, blending the repair in the process.


I had my Dad weld up the puller to the receiver, he took the liberty of grinding down the joint. I'll sand it smooth...


I plan on welding these long nuts to the bottom of the receiver to attach it to the stock


The connector nuts were too long for the rear attachment, so I marked and counter sunk a hole for a standard 1/4-20 nut .

I had my buddy mig-weld the nuts to the receiver.


I had to make some clearance for the rear nut


Test fitting the receiver to the stock


Stay tuned for part 3