Now we can get down to business, the first step is disassembly
The butt pad had multiple screws and even a couple of brads holding it on.
The mess left behind by the previous owner
After removing everything from the stock, I covered it in a thick coat of Citristrip finish remover, then I let it sit for 20-30 minutes.
Then using a hard plastic scraper I removed the old finish. If you skip this step you are going to waste a lot of sand paper as it will get clogged with the old finish
Then do the same to the other side, rinse, lather, repeat
Before I start sanding I need to fit the new butt plate, but to do that I need to drill the old holes and glue in the dowels
After letting the glue dry overnight I got to installing the new butt pad. I cut the dowels down and sanding the butt with 100 grit sand paper and a block of wood
When I went to fit the Fajen plastic butt plate I realized that it didn't have enough meat around the edges to be fit to this stock. So I dug into my supply and pulled out another one, this is a brownish/red grind to fit style.
I marked the first hole and drilled it under size, then screwed in the screw, remember to use dish soap and a round shank screw driver. I then marked and drilled the bottom hole
This pad will ad about 1/2" to the length of pull, putting it around 14.25", still manageable
90% fitted with the belt sander, the rest will be done by hand
I noticed the grip cap was rounded, I started filing it to get it flat
I also decided to cut some flutes in the comb and redefine the grip area
The cuts are not deep, just subtle enough to change the look of the stock from a mass produced factory stock, to something a little more custom
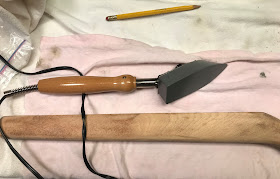
After sanding the stock to 100 grit, I mark the dents and then steam them out with an iron
I then sanded the entire stock with 150 grit sand paper
After sanding to 320 grit, I wetted the wood again to raise the grain, then rubbed it down with 0000 steel wool, I will do this two more times in the hope that the process of applying the dye will not raise the grain.
Before dying the wood I needed to fit the sling swivel studs.
The bipod I have attaches to a sling swivel stud, and since this stock already had the holes drilled it just made sense to order up a new set.
I have a special set of bits for installing these
I had to use a standard drill bit to get all the way through, then went back to the special bit to route out the recess for the nut
I then installed the nut and drove it down into the wood, just below the barrel channel
For color I will be using Fiebings Leather Dye in Dark Brown, I had purchased a wood dye kit, but have not gotten around to testing it yet, so I'll stick with the Fiebings, even though the color is sometimes uneven. I really like the reddish/brown "tobacco" color we get with this dye.
When finished it will look something like this one (Lil' Buckeroo Project)
After applying the dye I hang it to dry for an hour or so
Then I check the stock for whiskers and use the steel wool to knock them down.
Now it is time for the Tru-Oil. On Walnut stocks I prefer using the Minwax Antique Oil and a satin finish, but with non walnut stocks I prefer a deep gloss. It makes them look more interesting, definitely better than the "Mar-Shield" finish that Marlin puts on them.
This is after the first coat of Tru-Oil, it takes 2 or three coats before you see any shine, the oil is still being absorbed and filling the grain. Every 24 hrs I will be wiping the stock down with 0000 steel wool (to remove any lint, dust or runs) and then rubbing in another coat. I use my index finger and rub until the oil is almost dry, just a little bit tacky.
After 4 coats of Tru-Oil with 24hrs curing in between the stock was ready. I installed the swivel studs and cleaned up the recoil pad with some Armor All, then wiped the stock down with carnuba wax.


No comments:
Post a Comment