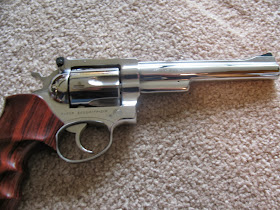
This post is about polishing the metal on your firearms, specifically stainless guns.
I have always liked the look of shiny guns, a shiny gun represents work, craftsmanship, a dedication to perfection. Most guns produced these days are not shiny, but you can change that.
When bluing guns I work on getting the metal as flat and smooth as possible. Just like in auto body work, the smoother the metal is, the more evenly it will reflect light, which will provide more shine and gloss.
It should be said that you do not need to make the metal shine like chrome to have a good looking finish. Some finishes are designed to be matte or satin.
The gun below is a Single Action Ruger that was finished in a satin finish, it looks beautiful. you will notice the metal still reflects light, but the reflection is muted. You may also notice the complete lack of blemishes. That is the key...
This gun was meticulously polished before bluing. To achieve this level of shine requires a lot of patience and care (and a good condition gun to start with)
This is what it looks like now:
I did the same this with my Ruger Security Six, before:
and after:
So, this brings me to the reason for my post. I recently acquired this Smith & Wesson 629-3 Classic Hunter 44 Magnum. Those of you that do not know, the '6' in the '629' designates this gun as being made from stainless steel. The gun was part of a limited run in 1991, only 2000 of these were made.
Here is what it looked like when I brought it home:
The 1st step in polishing a revolver like this is to remove the grips and look for scratches that you need to remove. This gun had only two minor scratches so I stuck with 1000 grit wet/dry sand paper. Had the scratches been deeper I would have started with 320 or 400 grit, then move to 600 and 1000 grit. Remember when using the higher grit (lower number) to be careful of the roll marks and screw holes.
Once you have the entire surface sanded with the 1000 grit, you can begin polishing. I prefer to use a soft cotton towel and Mother's brand polish
Mothers is a rouge, that acts as a very minor abrasive, removing minute amounts of metal, use plenty of Mother's and move to a clean section of towel when it turns black. Take your time.
I will update this post when complete. In the meantime I will get back to polishing my gun :).
Here are the updated pictures, it is not perfect, but it's getting there
There is a great explanation of sanding/polishing here: http://www.teslamap.com/public/polish/index.html
Special thanks to:
Bowen Classic Arms
http://www.bowenclassicarms.com/
Mob Guns
http://www.mobguns.com/
Mother's Polish
http://www.mothers.com/


.JPG)


Any tips on a Smith & Wesson Pre-Model 10 with a nickel plated finish?
ReplyDeleteIt is circa 1923, and in excellent condition, I still fire it at least annually, but it could use a bit of age rollback.
No way I'd touch it with any sandpaper, no matter how low grit it is.
yeah, try pure carnuba wax. It is very gentle on the finish and will help bring back the shine. Simonize and Mothers make it (at the Auto supply store) or Johnson's Paste wax (at the hardware store)
ReplyDelete